


Intro
Contents
Caffe is a deep learning framework made with expression, speed, and modularity in mind. It is developed by the Berkeley Vision and Learning Center (BVLC) and by community contributors. Yangqing Jia created the project during his PhD at UC Berkeley. Caffe is released under the BSD 2-Clause license. In this tutorial I’ll show you how to compile Caffe with support from nVIDIA’s GPU computing capabilities, CUDA and CUDA Neural Network on a Windows 10-x64 machine.
Prerequisites
In order to successfully build Caffe from source, you will need to meet the following prerequisites:
Microsoft Visual Studio 2013
You should have Microsoft Visual Stduio 2013 (which currently is the only version that CUDA 7.5 has compatibility with). Any edition (as long as it is VS2013 with MSVC12 compiler) will work, but if you do not have any of the professional/paid versions, you can simply get the free Community Edition from HERE. You need to have it installed before continuing with the rest of build process, because CUDA 7.5 at this moment only works with this version of Visual Studio and it DOES NOT work with Visual Studio 2015 or later (unless nVIDIA updates its NSIGHT package).
NVIDIA CUDA Toolkit 7.5
You need to install CUDA 7.5 from HERE. Please note that if you are a hardcore gamer ( like myself 😀 ) make sure that uncheck the suggested driver versions since they are really outdated. If you do not care about gaming, you can go ahead and install the drivers which are included with the CUDA installer, as it is necessary to allow the installation of GPU Deployment Kit (which is NOT necessary to build Caffe, just saying!)
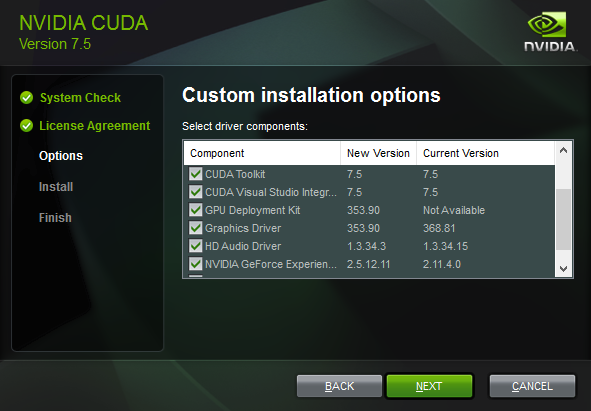
The custom installation options.
After successful installation of CUDA 7.5, make sure that the following environment variables have been added to your system. Double check the correctness of the paths (just to be sure…for comparison, you can see the values which I have in my own system):
CUDA_PATH => C:\Program Files\NVIDIA GPU Computing Toolkit\CUDA\v7.5
CUDA_PATH_V7_5 => C:\Program Files\NVIDIA GPU Computing Toolkit\CUDA\v7.5
NVIDIA CUDA Neural Network Library 4
You will need nVIDIA’s CUDA Neural Network library version 4 which can be downloaded from HERE. The correct archive file is named cudnn-7.0-win-x64-v4.0-prod.zip. After extraction, this archive file yields a folder named cuda which is indeed quite confusing. But you only need to copy this folder and paste it in your actual CUDA installation folder. Again, in my case, I pasted this folder right into C:\Program Files\NVIDIA GPU Computing Toolkit\CUDA\v7.5
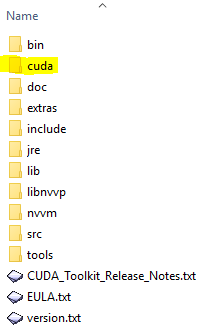
Your CUDA 7.5 folder should look like this. The highlighted folder is the cudnn v4
Now, pay a visit to your Environment Variables Settings and add the following enteries (replace the given path to the actual place you have installed the CUDA and copied cuda aka cudnn folder into):
CUDNN_PATH => C:\Program Files\NVIDIA GPU Computing Toolkit\CUDA\v7.5
CuDnnPath=> C:\Program Files\NVIDIA GPU Computing Toolkit\CUDA\v7.5
Somehow if you do not add these two options, the build process will fail, complaining about not being able to fine cudnn.h file. By now, this file should be in the following path if you have followed my guideline:
C:\Program Files\NVIDIA GPU Computing Toolkit\CUDA\v7.5\cuda\include\cudnn.h
NUGET Command-Line utility
You will need to download many dependencies of Caffe using nuget command line utility which can be downloaded from HERE. I am using version 3.X. Just make sure to put this single exe file somewhere which is known by your Path environment (e.g. make a directory named tools in your C: drive and add that directory to Path).
GIT
Do I really need to explain this?!


Thanks a lot, this helped me to install caffe (I was not able to do it from other repositories which claim to be the windows port). I do not have nvidia graphics card so I went CPU only.
Glad it helped. I recommend running caffe with the help from gpu, because using only the cpu will make complex projects take forever!
I’d like to thank you for this quick but expressive guide, it was really helpful. I’d like just to ask something, does this port support the newest version of CUDA (8.0) for Pascal architectures and CuDNN 5.0 or 5.1? Thanks again!
I believe not, at least for the Windows platform…CUDA 8 is quite new and it will take a while (maybe well over a year) for Caffe to catch up. But I believe there has been some activities on Linux side of things according to BLVC on GitHub
Caffe can be compiled with either Make or CMake. Make is officially supported while CMake is supported by the community.
I did not have any success on Windows to build using CMAKE, I always got lots of errors in CMAKE. If you know the correct procedure please let us know!
Hello Saeid,
Thank you very much for the nice explanation.
I have successfully installed CUDA Toolkit and VS 2013. After that copied the ‘cuda’ folder in cuDNN to C:\Program Files\NVIDIA GPU Computing Toolkit\CUDA\v8.0
I couldn’t understand what to do after. Can you please help to complete the installation as i want to run this code https://github.com/rbgirshick/rcnn/tree/d0a24bec888e123885f8a229cc4f4a71cbeee80d
You need to create some layers to train the classifier, there are plenty of examples provided by caffe! just check those out.
Hello Saeid
I have followed all the steps. And I am getting the following error while building the caffe.sln file.:
Error 25 error : NuGet Error:Unknown command: 'overlay' G:\Research\NugetPackages\glog.0.3.3.0\build\native\glog.targets 329 5 upgrade_solver_proto_text
I am getting the following output from the build:
1>------ Build started: Project: libcaffe, Configuration: Debug x64 ------

1>G:\Research\NugetPackages\glog.0.3.3.0\build\native\glog.targets(329,5): error : NuGet Error:Unknown command: 'overlay'

2>------ Build started: Project: caffe, Configuration: Debug x64 ------

3>------ Build started: Project: convert_cifar_data, Configuration: Debug x64 ------

4>------ Build started: Project: classification, Configuration: Debug x64 ------

5>------ Build started: Project: convert_mnist_data, Configuration: Debug x64 ------

4>G:\Research\NugetPackages\glog.0.3.3.0\build\native\glog.targets(329,5): error : NuGet Error:Unknown command: 'overlay'

3>G:\Research\NugetPackages\glog.0.3.3.0\build\native\glog.targets(329,5): error : NuGet Error:Unknown command: 'overlay'

6>------ Build started: Project: convert_mnist_siamese_data, Configuration: Debug x64 ------

7>------ Build started: Project: upgrade_net_proto_binary, Configuration: Debug x64 ------

5>G:\Research\NugetPackages\glog.0.3.3.0\build\native\glog.targets(329,5): error : NuGet Error:Unknown command: 'overlay'

8>------ Build started: Project: upgrade_net_proto_text, Configuration: Debug x64 ------

2>G:\Research\NugetPackages\glog.0.3.3.0\build\native\glog.targets(329,5): error : NuGet Error:Unknown command: 'overlay'

9>------ Build started: Project: compute_image_mean, Configuration: Debug x64 ------

7>G:\Research\NugetPackages\glog.0.3.3.0\build\native\glog.targets(329,5): error : NuGet Error:Unknown command: 'overlay'

6>G:\Research\NugetPackages\glog.0.3.3.0\build\native\glog.targets(329,5): error : NuGet Error:Unknown command: 'overlay'

10>------ Build started: Project: convert_imageset, Configuration: Debug x64 ------

8>G:\Research\NugetPackages\glog.0.3.3.0\build\native\glog.targets(329,5): error : NuGet Error:Unknown command: 'overlay'

11>------ Build started: Project: extract_features, Configuration: Debug x64 ------

12>------ Build started: Project: test_all, Configuration: Debug x64 ------

9>G:\Research\NugetPackages\glog.0.3.3.0\build\native\glog.targets(329,5): error : NuGet Error:Unknown command: 'overlay'

13>------ Build started: Project: pycaffe, Configuration: Debug x64 ------

10>G:\Research\NugetPackages\glog.0.3.3.0\build\native\glog.targets(329,5): error : NuGet Error:Unknown command: 'overlay'

11>G:\Research\NugetPackages\glog.0.3.3.0\build\native\glog.targets(329,5): error : NuGet Error:Unknown command: 'overlay'

14>------ Build started: Project: matcaffe, Configuration: Debug x64 ------

15>------ Build started: Project: upgrade_solver_proto_text, Configuration: Debug x64 ------

12>G:\Research\NugetPackages\glog.0.3.3.0\build\native\glog.targets(329,5): error : NuGet Error:Unknown command: 'overlay'

13>G:\Research\NugetPackages\glog.0.3.3.0\build\native\glog.targets(329,5): error : NuGet Error:Unknown command: 'overlay'

14>G:\Research\NugetPackages\glog.0.3.3.0\build\native\glog.targets(329,5): error : NuGet Error:Unknown command: 'overlay'

15>G:\Research\NugetPackages\glog.0.3.3.0\build\native\glog.targets(329,5): error : NuGet Error:Unknown command: 'overlay'

========== Build: 0 succeeded, 15 failed, 0 up-to-date, 0 skipped ==========
Please help me out, as I have been trying to build caffe since last week.
Thanks.
– Lopa
I think this is a NuGet error, perhaps you have the wrong version! I think you better download standalone .exe of NuGet and try again…I cant remember but I think version 3 or 2 should work. Then pass the location of new downloaded NuGet.exe into the build file.
Hi. Saeid.
Your explanation is very helpful. but I get error in Project\Caffe\windows> Nuget restore Caffe.sln …. . It says Failed to load msbuild Toolset.
I download Nuget V3.5.0
What should I do.
Thanks you.
Hi, as far as I remember you should download the standalone executable of nuget, version 2 or 3…try both!
Hey saeid, first of all thank you for this tutorial ,
I compiled caffe but when I try to use it in matlab it gives an error , invalid mex file
That is a Matlab specific error…usually it means something is wrong with path to a library or something….
Hey.
Maybe you have to change the “mex -setup” in Matlab.
Hi..Thanks you Saeid,
Your explanation is very helpful.
But I still have the error when build caffe.sln.
The message is as follow ( for 13 descriptions):
Error 2 error : NuGet Error:Unknown command: ‘overlay’ C:\Project\NugetPackages\OpenCV.2.4.10\build\native\OpenCV.targets 768 5 caffe
What I should do Saeid?
Thanks you in advance,
Best regard,
Ismail
Thank you so much Saeid ! 🙂
I have installed caffe CPU only with (Python_support) on my Windows 7 successfully.
I want to run one example at https://github.com/shi-yan/caffe/tree/master/examples/cpp_xor
Please help me.
where can i find Nuget V 2.5?
it Nuget site only > 2.8 is available
I think you can find it on this link:
Download NuGet Standalone V2.5.0
i can not install on windows. If it is possible for me to install with teamviewer.
Settings and add the following enteries (replace the given path to the actual place you have installed the CUDNN_PATH = C:Program FilesNVIDIA GPU Computing ToolkitCUDAv7.5 CuDnnPath= C:Program FilesNVIDIA GPU Computing ToolkitCUDAv7.5
Hello sir, how to do this (make sure that your build mode is set to Debug and the target architecture is set to x64.)